Now that you have a basic idea of how ultrasound works, it’s time to dive into the specifics of echocardiography. This following is a brief introduction to 2D echocardiography principles. A detailed description is beyond the scope of this guide, so if that is what you are looking for, we recommend picking up a good echocardiography textbook.
Basic anatomy of the heart and great vessels
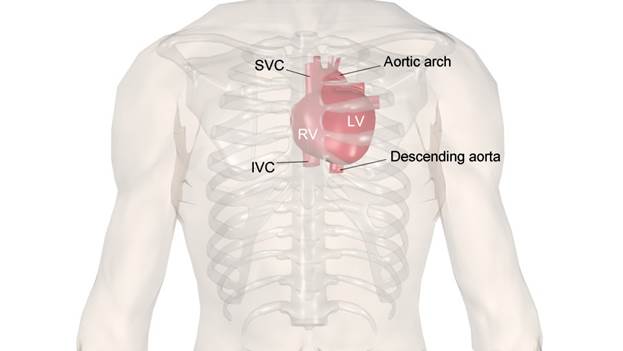
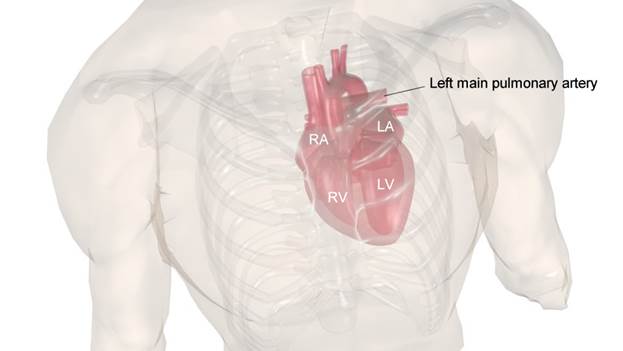
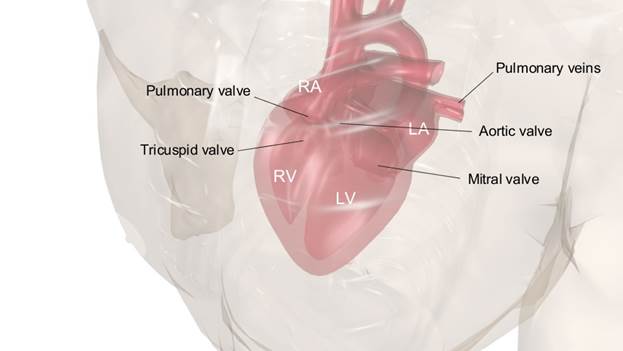
The images below illustrate the position of the different cardiac chambers and great vessels. It is important that you visualize the heart in your mind as you move your probe so that you know what to expect to see on the screen.
Basic echo views
When you move the probe over the patient’s chest, it’s likely that you can obtain a view of the heart from almost anywhere. However, several “standard” views have been recognized which are needed to fulfill a proper echocardiographic examination. There are many instances when in order to better view a particular detail you might need to deviate from these views and come up with an “off-axis” view, but for the most part these standard views provide all the essential data needed from a typical echocardiographic study.
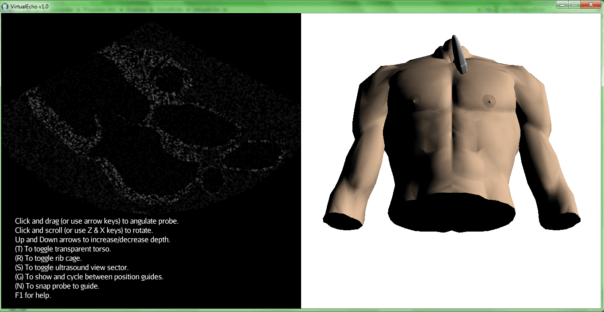
While you are using VirtualEcho, you can press “G” at any time to show and cycle between guides showing you where the probe should be placed to obtain each of the standard views mentioned below.
Parasternal long axis view
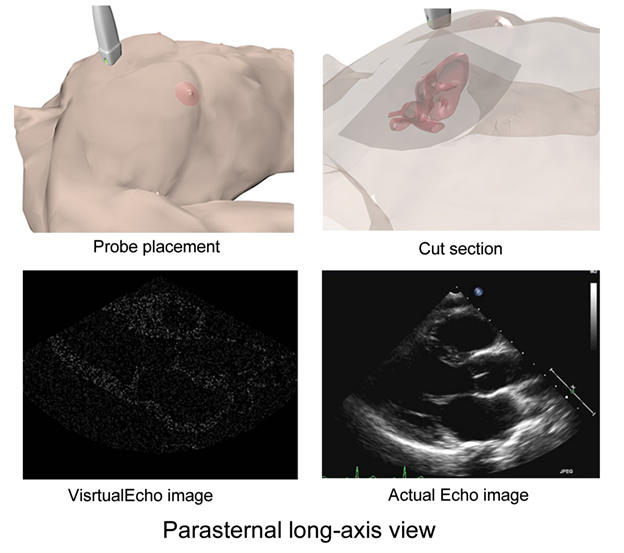
The parasternal long axis view is usually the first view obtained in an echocardiographic study, and is typically obtained by placing the probe in the second or third left intercostal space (remember, you can’t be on a rib!) just lateral to the sternum, with the knob (the little lamp on the edge of the probe) turned towards the patient’s right shoulder. In this view, the ultrasound sector first cuts through the right ventricular (RV) free wall, followed by the RV cavity, the interventricular septum, then the left ventricular (LV) cavity continuous with the aorta above and separated from it by the aortic valve, and finally the left atrium below with the mitral valve separating it from the LV.
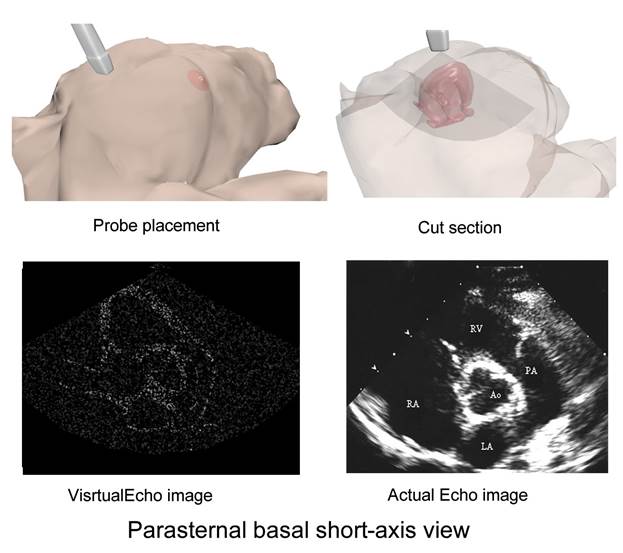
Parasternal short axis view
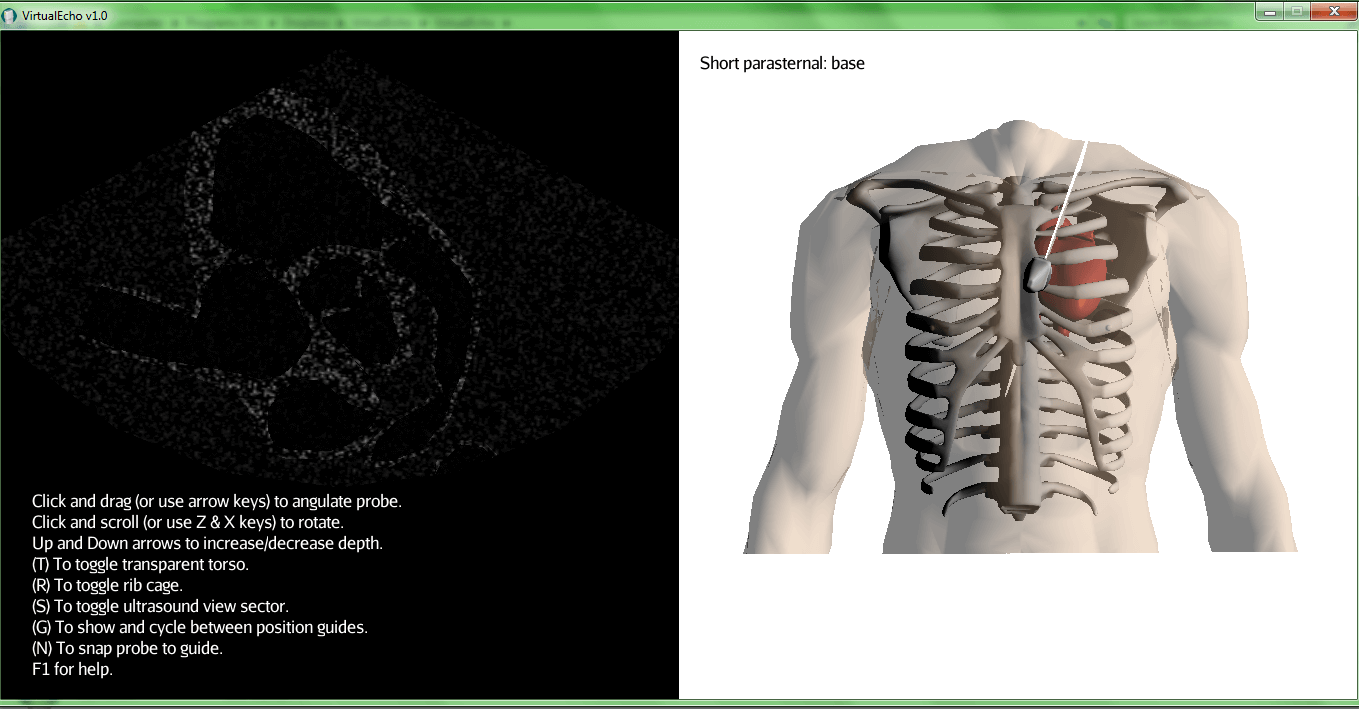
By rotating the probe 90 degrees clockwise, you now cut the heart transversely instead of longitudinally, and by varying the probe’s inclination (referred to as angulation or tilt) you can obtain sections of the heart at varying levels. Tilting the probe so that the part in contact with patient faces more towards the patient’s head is called cranial angulation, and enables you to look at the base of the heart (aortic valve and roots of the great vessels) as in the following image:
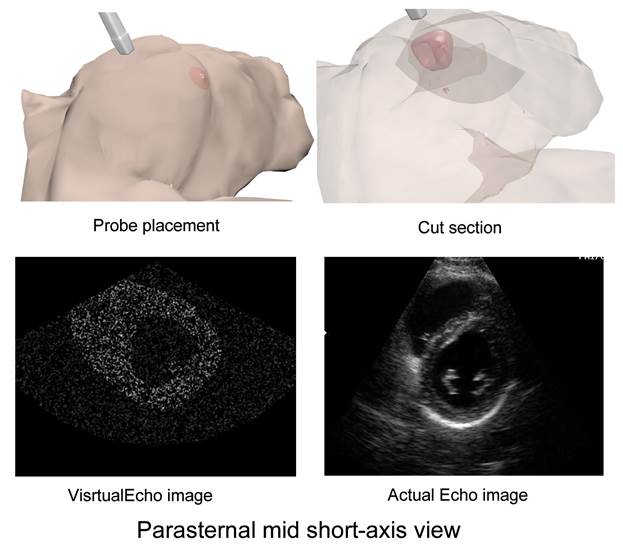
On the other hand, tilting the probe so that it faces more towards the patient’s feet is called caudal (or hepatic) angulation, and enables you to look at the LV cavity, mitral valve and apex, depending on the degree of tilt. They will all look circular since you are cutting the heart transversely. Images illustrating the mid-LV cavity level of the parasternal short axis view are shown below.
Apical four chamber view
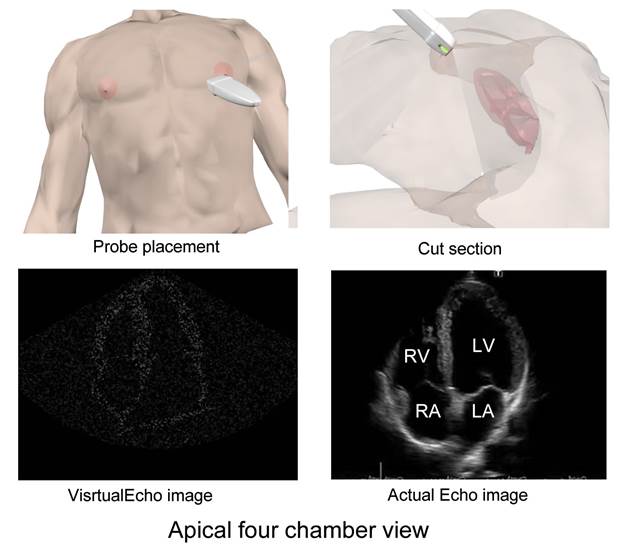
This view will probably seem the most familiar to you, because it shows the four chambers of the heart together side by side the way they’re found in textbooks. It is typically obtained by placing the probe at the apex (usually the 5th intercostal space just inside the midclavicular line), with some cranial angulation, and with the knob pointed towards the patient’s left shoulder. This way the ultrasound sector cuts through the four chambers of the heart together, with the apex of the heart lying at the apex of the sector.
Apical five chamber view
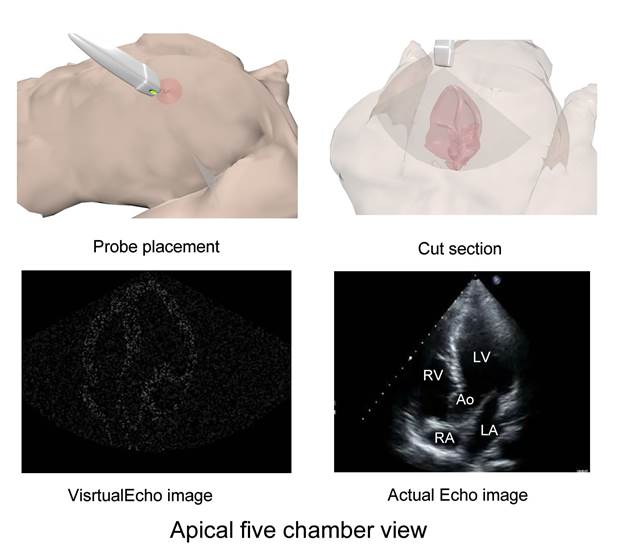
While still at the apical four chamber view, slight cranial angulation will bring the left ventricular outflow tract (LVOT) into view, together with the aortic valve and aortic root. This is called the apical five chamber view (the aorta being the 5th chamber).
Apical two chamber view
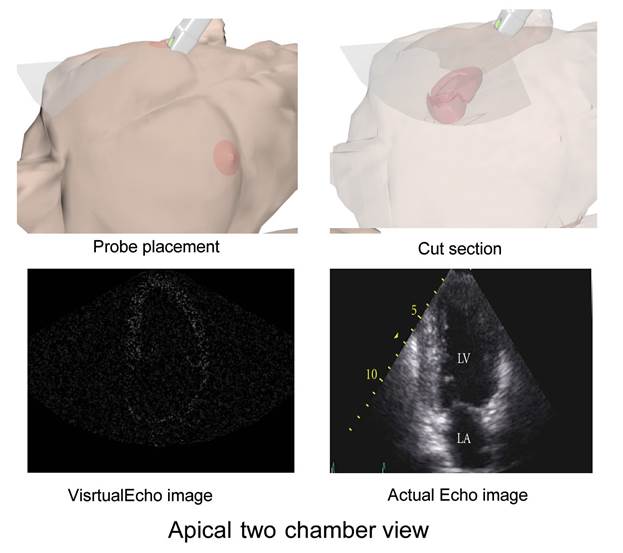
From the apical four chamber view, rotation of the probe counterclockwise by 90 degrees will result in the sector cutting vertically through just the left atrium and ventricle, constituting the apical 2 chamber view.
Apical three chamber view
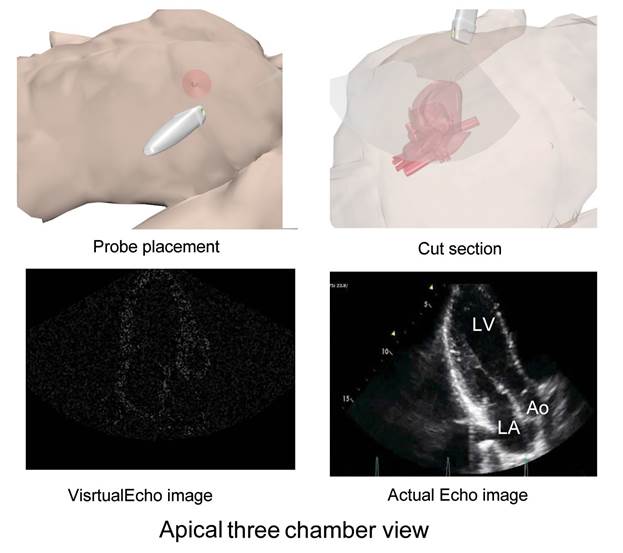
Further anticlockwise rotation will again visualize the LVOT, aortic valve and aortic root (three chambers). The apical three chamber view is in essence a rotated version of the long parasternal view.
Subcostal view
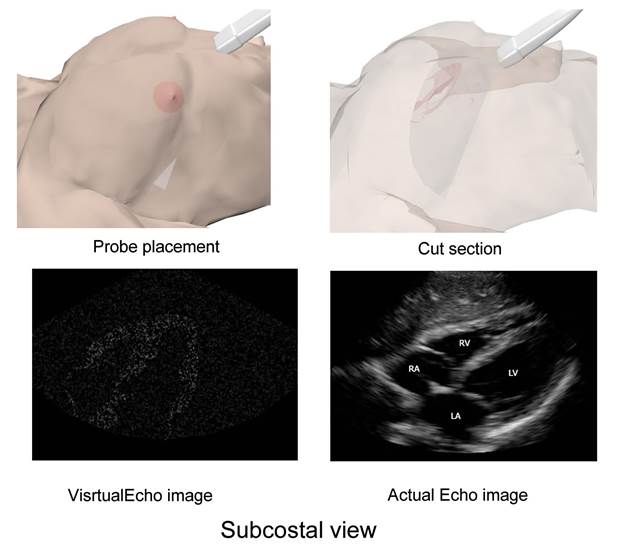
The subcostal view is obtained by placing the probe below the xiphoid process of the sternum, with steep cranial angulation. The probe may also be tilted laterally towards the heart. This view is sometimes the only obtainable view in patients with chest conditions precluding ultrasound wave passage through the chest, such as obstructive airway disease and pneumothorax.
Suprasternal view
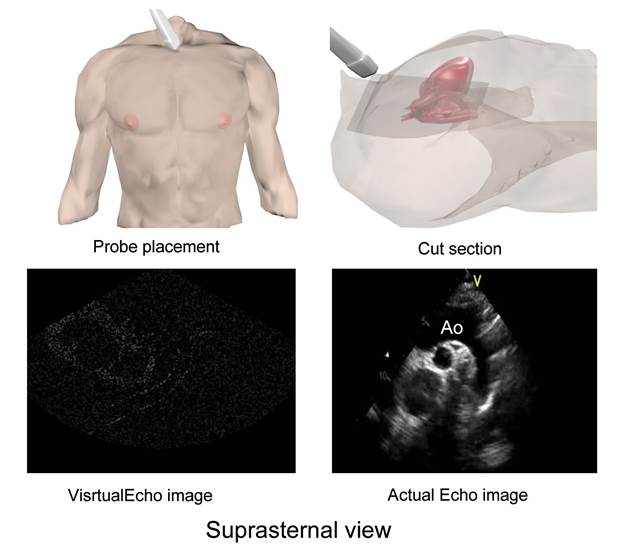
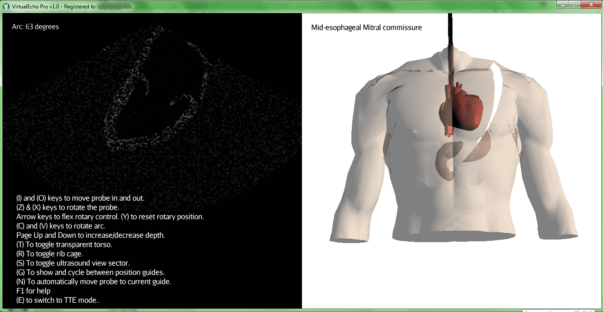
The suprasternal view serves to examine the great arteries: aorta and pulmonaries. It is obtained from the suprasternal fossa with the neck in full extension, and the knob at 1 o’clock. It shows the entire course of the thoracic aorta with the pulmonary artery seen head-on. This view is useful to check for coarctation of the aorta and a patent ductus arteriosus.
That’s it! Now that you have a basic notion of what you need to do, it’s time to learn how to put this knowledge to use. Move on to the next section: Using VirtualEcho.